
|
|
The “Picket Fence” Tactic
Viscount Sir Saeric Scireham
| Military formation is like water -- the form of water is to avoid the high and go to the low, the form of a military force is to avoid the full and attack the empty; the flow of water is determined by the earth, the victory of a military force is determined by the opponent. |
| So a military force has no constant shape: The ability
to gain victory by changing and adapting according to the opponent is called
genius.
-- Sun Tzu |
The “Picket Fence tactic” is fluid approach to melee strategy. It has no set formation because fighters with particular weapons constantly shift position in response to the formation presented by the opposing unit. This ability to shift formation quickly gives the unit using the Picket Fence tactic the ability to always use the strongest possible formation in battle, no matter the situation.
For years, standard melee tactics have placed a shield wall in the front of the formation with great weapons behind the shield wall. The shields are interlocked or tightly packed and the shieldmen are told, “Stay alive and protect the great weapons, which do all the killing.” Standard melee tactics could be compared with 18th century infantry tactics where opposing armies stood in front of each other closely packed in neat rows, shooting volley after volley until one side suffered too many casualties and broke formation. The Picket Fence tactic was devised by Viscount Tristan von Eisig and Lord Trevelon Silverhelm as a way for melee units to be more flexible, more offense-oriented and to achieve the “formlessness” which is the goal of Eastern strategists.
The Picket Fence tactic takes more time for a unit to learn. In standard melee tactics, fighters line up once in formation and only need to maintain their approximate position in the formation during the battle, no matter what the opposing unit does. The Picket Fence tactic requires that every fighter be aware of what the opposing unit is doing and adjust accordingly throughout the battle.
The advantages of the Picket Fence tactic are well worth the extra time and effort it takes to learn. These advantages include:
-- The Picket Fence tactic is more offensively minded. The standard melee tactic is basically a defensive tactic. But no matter how well a unit holds their formation and resists their opponents, eventually the opposing fighters have to be killed in order to win the battle.
-- The Picket Fence tactic always uses the best formation for the situation. Usually a formation is set before a battle and can’t be changed once the opposing unit reveals what they will do. The Picket Fence tactic allows a unit to change its formation in seconds, countering whatever the opposing unit presents.
-- The Picket Fence tactic allows a unit to take advantage of opportunities as soon as they present themselves. It decentralizes command by making individual fighters and their small unit commanders responsible for decisions during the battle. This allows the unit as a whole to exploit opportunities that disappear as quickly as they appear during the flow of a battle.
-- The Picket Fence tactic creates opportunities for all weapons -- weapon and shield, pole and spear -- to be active in the battle and to perform heroic feats.
The Picket Fence tactic operates based on the strategy fundamental “rock blunts scissors,” “paper wraps rock” and “scissors cut paper.” The “rock” is a shield wall that stops a charge. The “paper” is a line of skirmishers that attacks a shield wall. The “scissors” are a charge that attacks skirmishers.

The Picket Fence tactic uses teams, or “triads,” of three fighters -- one with weapon and shield, one with polearm and one with spear. Each member of the triad steps to front and takes the offensive lead in the battle as the correct situation presents itself. Two or more triads join together in small units that respond to the flow of the battle.
The triads do not necessarily have to be three fighters, nor does the Picket Fence tactic require a large unit to consist of equal numbers of fighters with weapon and shield, polearm and spear. Three-person “triads” is the idealized model, but the triads are made up with fighters who practice together regularly. So, for example, a triad could consist of five fighters -- two weapon and shield, two polearms and one spear. The primary consideration when forming the triads is to have fighters who can function together smoothly as they rotate positions in response to what their opponents do.
Likewise, when triads are combined to form larger units it is not necessary to have equal numbers of each weapon style. In fact, depending on the battle scenario, an equal mix of weapons may be undesirable. For example, a bridge battle involves holding a position and attacking an opposing unit in an entrenched defensive position, so extra shields and extra spears would be most effective. A field battle often requires a unit to be more mobile and attack on the run -- a situation where it is harder for spears to be effective. So extra polearms and shields would be the most effective weapon mix.
Whatever the numbers of each weapon style are, it is most important that the fighters are using a weapon they are competent with. A unit that is 90 percent weapon and shield fighters will be more effective than a unit with an equal number of fighters using weapon and shield, polearm and spear if the spear and polearm fighters are mediocre with that weapon style.
Movement within the Triad
As was already mentioned, a simple way to understand the Picket Fence tactic is to think of “rock blunts scissors,” “scissors cuts paper,” and “paper wraps rock.”
The “Rock” formation is a shield wall that stops a charge by the opposing unit. When the opposing unit charges, the weapon and shield fighters step to the front. Spearmen retreat a step and a half behind the shields, leaving room for the polearms.
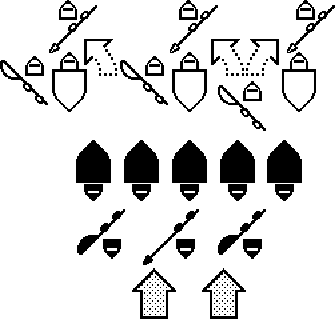
The polearms fill spaces between the shields, setting themselves half a step behind the shieldmen. The spears poke their weapons out past the shields, so the spears strike fighters in the charging unit before the charging unit strikes the shield wall. This blunts the momentum of the charge and minimizes its effect at the point of impact.

If opposing fighters press the polearms, that half step allows them to slide behind the shieldmen easily and quickly.

Even when the Picket Fence tactic forms a shield wall, it is an open formation where opposing fighters are able to penetrate past the first row of shields. However, when this happens the opposing fighter will run into a shield from the second set of triads, and will be attacked from both sides by polearms and spears.

It is important to remember that a unit never should accept their opponent’s charge passively, or the unit will be pushed backward and their opponent will have control of the fighting at the point of contact. Instead, each fighter should take one step forward into the charge. At the same time they should bend their knees slightly, so they can rise from below their opponent’s center of mass at the moment of impact. Stepping forward and lifting will blunt the impact of the opposing unit’s charge.
The “Paper” formation is a line of skirmishers that attack a stationary shield wall. Weapon and shield fighters remain stationary, while spear and polearm fighters move forward to within weapon range of the opposing shield wall. The spears will be able to attack the shield wall with impunity, because the opposing spears will be positioned out of range, behind their own shieldmen.
Spears need to attack in concert with other spears or polearms. Individual spearmen will have limited success, since they can land blows only if their opponents leave openings to thrust through. Working in teams, a polearm or second spear can create an opening that the first spear can exploit.

If the opposing shield wall advances or charges the skirmishers, the triads rotate from the “Paper” formation to the “Rock” formation. The spears retreat behind the shields, the polearms line up slightly behind the shields and they and the shields prepare to accept the charge.

The “Scissors” formation is a charge that attacks the opposing unit’s skirmishers. In a static situation, where the opposing unit has skirmishing great weapons attacking the formation, the triads move forward as a unit. The shields are forward to block the opponent’s spear thrusts, and the polearms are prepared to knock down thrusts attacking shieldmen from the sides.

The charge should halt before the foremost fighters enter the weapon range of the opposing shield wall. The purpose of the charge is to kill as many of the opposing unit’s great weapons, while accepting as few casualties as possible. A charge from the open formation of the Picket Fence tactic will not be able to engage a tight shield wall without unacceptable losses.

Movement of Small Units Within a Formation
Just as individual fighters must shift position within a triad in response to the actions of the opposing units, small units of two or three triads must shift within a larger formation. The small units are semi-autonomous during the battle. They react without orders to maintain the larger formation. But they also may be given instructions by the battle commander to respond in some situations.
Small units are arranged in layers, one behind the other. The large formation can have one, two or more small units arrayed across it’s front, depending on the number of fighters available and the requirements of the battle. But ideally, the large formation should be at least three layers deep.

Arranging the small units in layers within the formation makes it possible for small units to re-enforce the formation wherever it is attacked.
As was discussed above, the relatively open shield wall makes it likely that opposing fighters will be able to penetrate past the first row of shields. If they do, the opposing fighters will run into shields from the second layer of triads and they can be attacked by polearms and spears from both sides.
The second layer of triads also is in position to replace quickly any fighters from the first layer that are killed. The entire triad from the second layer can step into the void left by the killed fighter, while any remaining members of the original triad can move to the rear of the formation and join with other fighters to form new triads.

With several layers of triads to re-enforce the large formation, it is very strong when attacked from the front. However, the formation is weak on the sides and vulnerable to a flanking attack.
To counter a flanking maneuver, the opposing flanking unit must be intercepted before it can attack the weak side of the large formation. A small unit from the third layer of triads moves to attack the flanking unit.
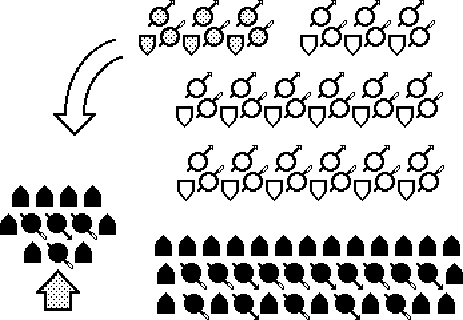
If necessary, the small unit from the third layer of triads could be re-enforced by another small unit. If the front layer in not being pressed, then the unit from the second layer, which is the nearest unit, can add it’s force to attacking the opposing flanking unit.

If the front line is being pressed and the second layer is needed to re-enforce it, then another small unit from the third layer can assist the first unit in attacking the opposing flanking unit.

The decision of which small units to use can be made either by the battle commander or by the small unit commanders. Just as individual fighters need to talk to each other during a melee, small unit commanders need to communicate to coordinate their efforts.
Individual Weapon Styles in the Picket Fence Tactic
Weapon and shield fighters must face their opponents as an individual in the Picket Fence tactic, instead of carrying part of a stationary wall. So their shields must be one they could use comfortably in single combat -- larger than a tournament shield, but smaller a typical war shield. The shield also should be mounted so it can be moved in offense and defense instead of held in a static position. Likewise, the sword should be a length that is comfortable for the fighter but long enough to be effective in the open field.
Polearm and spear fighters each must work as part of a team. As was mentioned above, a spear fighter can be effective only if his opponents leave openings. Working as part of a team, the spear fighter will have another fighter to create openings he can thrust through.
In addition, every spear should have a hook, so the spear fighter is able to create openings in the opposing defense by pulling shields out of position. Also, polearms should be seven and a half feet long -- the maximum length allowed -- so the polearm fighter the greatest possible reach and will not be at a disadvantage against opponents with longer weapons.
Other Formations
It is important to remember that while the Picket Fence tactic is a flexible strategy to use for many situations, but is not the best formation to use for every situation. There are other tactics and formations that achieve better results in special circumstances.
One example is a column, which is the best formation to use when a unit is required to force its way through an opponent with an established shield wall. In the column shields are placed along both sides, with the spears and polearms protected on the inside. A wedge of shields leads the column through the opposing fighters.
