|
|
|
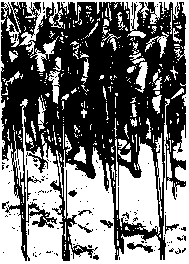 A
Guide to SCA Skirmish Units
Wherever I felt it might be beneficial I have given illustrations. Below is a legend box showing the various symbols used and what they represent.
Graphics Legend
![]() =
Shield Initial position
=
Shield Initial position
![]() =Enemy
Shield Initial position
=Enemy
Shield Initial position
![]() = Shield
Final position
= Shield
Final position
![]() = Enemy
Shield Final position
= Enemy
Shield Final position
![]() = Pole
Initial position
= Pole
Initial position
![]() = Enemy
Pole Initial position
= Enemy
Pole Initial position
![]() = Pole
Final position
= Pole
Final position
![]() = Enemy
Pole Final position
= Enemy
Pole Final position
My hypothetical unit; Wolf Pack, is composed of eight soldiers. Six soldiers are armed with spear while the remaining two carry sword and (small) shield.
What and why are skirmish units?
Why have skirmish units? What purpose do they serve?
Skirmish units are intended to create a small, highly
mobile force able to cover large distances quickly and engage or threaten
a superior force without themselves suffering high causalities. The skirmish
unit thereby attempts to create an advantage for their own army by splitting
off an enemy force larger than their own size, and delaying them from participating
in the main attack. After the army has won the main battle they can then
come to relieve (rescue) the skirmish unit. In addition a skirmish unit
can act as a 'predator' of small enemy units that have separated from their
main force, pouncing on them as a pack of wolves to the prey.
But if the skirmish unit is outnumbered, how can it
beat a superior force?
It can't. But to beat the superior force through attrition
is not it's goal. It's goal is to simply not lose. It's tactics therefore
are to never engage an equal or larger enemy in head on combat, but only
to harasses/threaten them &endash; not allowing the enemy unit to join
the attack on the main army.
What strategy should a skirmish unit use?
A skirmish unit is essentially a hit-and-run (aka Guerrilla)
weapon (which is period, as an example look at Welsh tactics). This means
that since the enemy's size and firepower cannot be matched, speed and
stealth are used instead. Always control where and when to strike, not
visa versa. Never let the enemy trap you into a forced engagement; remember
maneuverability is your defense. A pack of wolves is an excellent analogy:
Strike at the weak point, when they turn for face you, break off the engagement
while your comrades strike at the newly created weak point.
How should it be outfitted? What weapons? What armor?
A skirmish unit should be outfitted to best serve it's
purpose. It must be fast; light armor should be worn (there are many styles
of light period armor such as leather. Mail or full plate is not recommended).
Weapons should be light, easily carried while running and give an advantage
of range (remember no toe-to-toe engagements), spears make an excellent
skirmish weapon. A skirmish unit's defense is it's mobility, not it's armor.
To protect against the weakness inherent within any one style of weapon,
some variation of weapons should be used, have several fighters with an
individual style weapon, such as sword and small shield. This will allow
you to protect against the spear's main weakness; defense against a smaller
weapon form. If an enemy gets inside the spear's defense; your own sword
and shield fighter can be there to quickly 'dispatch' them.
Unit Organization
How should it be organized? What formations should
a skirmish unit use?
The various formations that any unit should use are according
to the situations you expect to occur (and wish to cause). How will you
respond to an attack from the front, from the flank or rear? How can you
best attack a larger unit? How can you rapidly move and deploy to a position
across the field? How to best cover a retreat? Below are some example formations
and commands. What is each formation's advantage? What are the disadvantages?
Some good rules:
Keep your commander away from combat as much as possible.
He/she is important to your unit's health, you don't want them to get killed.
Talk to your neighbors. This let's them know 1) You are
alive 2) Your location without having to turn to look 3) What you see.
Have a chain of command. If the commander dies then the
next person in line can assume command without wasting time discussing
who should lead. In addition this will allow you to split the unit into
sub-units, each with it's own commander.
Always, always, always,...regroup after each engagement.
A good skirmish unit uses a loose, flowing formation,
but a tightly disciplined organization.
Work with other units. A shield wall and a skirmish unit
that function together smoothly is greater than the sum of it's parts.
Formations
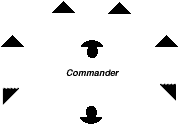 A.
Attack Formation: A blunted triangle or inverted V formation. The commander
is position within the center, able to view all sides. Although the commander
should not needlessly expose him or herself to danger, he/she may aid a
spear, if that spear is in immediate danger from an attack. From this formation
alternating flank attacks may be used (see Flank Left I Right below) or
an attempt to draw the enemy into a 'killing ground' created by use of
the V Formation.
B Wall Formation: The spears form a spear wall, standing side by side with a gap of two to three feet. Used within a tightly confined area such as a bridge or castle gate.
C. Screen Formation: The spears form a spear wall, standing side by side with a gap of one spear length. Used to protect and obscure movements of friendly units to the rear.
D. Open Formation: The spears form a spear wall, standing side by side with a gap of two spear lengths. Used to provide minimal protection to a very large area.
E. Double Column Formation: The spears form a double column facing the commander. The Rear Guard takes up the rear. This formation will allow both rapid movement and deployment into Affack formation.

F. Pack Formation: The unit attempts to encircle the enemy unit. Spears are in groups of two with the Shields attached to the opposite flanks.
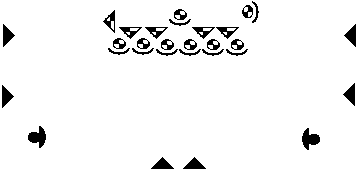
G. V Formation: Issued from either an Attack or Wall formation The commander and two front spears fall back while the flanks advance to form a line. The rear guard comes forward to support the commander. The intent is to draw an enemy force into the center where a 'killing ground' has been created.
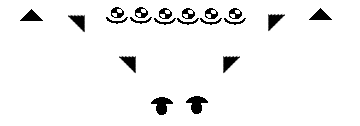
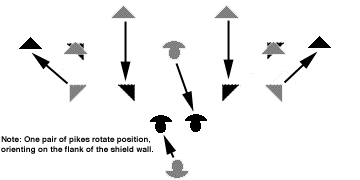
Deploying to V formation from Attack formation
Movement Commands
Note: Unless otherwise noted all movement commands continue
until a Stop command.
H. Follow Me: Usually after a Double Column Formation. The unit follows the leader.
I. Stop: Unit halts all movement. Should be used between other orders if there is a chance of confusion. All movement commands continue until a Stop command.
J. Advance [Slow, Fast]: Unit moves straight ahead.
K. Fall Back [Slow, Fast]: Unit moves straight back.
L. Run Away: The unit retreats in mock disarray. Do NOT expose your back to the enemy.
M. Shift Left/Right: The unit side-steps in the indicated direction.
N. Turn Around: Each person pivots in place 180 degrees.
O. Pivot Left/Right: Entire unit pivots in the indicated direction (Left = Counterclockwise, Right = Clockwise).
P. Wheel Left/Right: Entire unit advances towards the indicated direction in an arc. Person on end mentioned pivots in place.
Q. Refuse the Left/Right: Entire unit backs away from the indicated direction in an arc. Person on the end NOT mentioned pivots in place.
R. Attack: Unit attacks straight ahead.
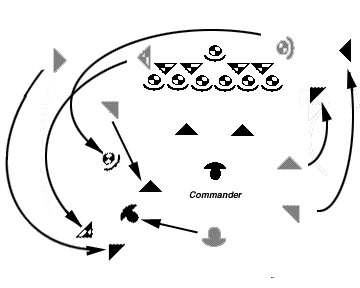
S. Left I Right Flank Attack: The indicated flank performs a flanking attack.
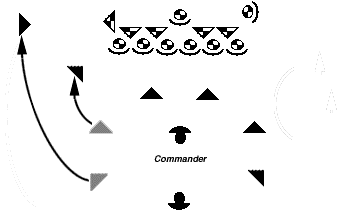
T. Left I Right Flank Retreat: The indicated flank retreats back into Attack position.
Last modified on: Tuesday, July 15, 1997.
Re-formatted on: Wednesday, December 5, 2001 by Jester
of Anglesey (John Jordan).