|
|
|
When two people fight, they move. They move in and out of range of each other's weapons. The art of positioning in fighting is commonly called "range control." This is not a very useful term because it actually refers to several different but equally important skills. I divide range control into three separate concepts: range definition, range movement, and range manipulation.
The first skill is range definition. To talk about range in any meaningful way we have to have a set of labels which we can all agree to and understand.
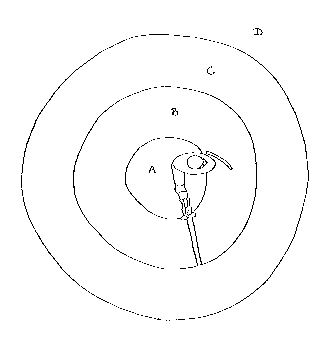
My picture for range definition is a series of concentric lines cut in half by another line. The lines which define each fighter's swordside and shieldside run through a series of lines which define the ranges. There are two sides and four ranges for each fighter.
Determining where the line between shieldside and swordside is while fighting is sometimes difficult because of stance and because of how the head is turned. The line runs perpendicular to the shoulder line right through the nose cutting the body in half. A neutral space also exists if both fighters stand nose to nose. This space (The Center) is vitally important, but hardly ever affects movement decisions. A fighter gains control of the center by other means because movement always redefines the center. The center becomes crucial after and before movement, generally not during movement.
The range areas in my system are designated by letters: A, B, C, and D. These areas are dependent on the individual fighters and circumstances, but may be defined universally.
Get in stance opposite an opponent and extend your swordside hand. Twist your hips, lean forward, do whatever you must to extend your hand as far as possible, but keep the position of your feet correct. Where your swordside foot is when your swordside hand reaches farthest away with your feet still correct is a point on the line between A and B. The A range is every place you can touch your opponent with your swordside hand.
Now repeat the process substituting your weapon for your sword hand. This is B. If you can touch him with the sword, but not the hand, you are standing in B.
From the edge of B, take one step (the largest step you can manage) directly backward. You are now at the edge of C.
The rest of the universe is D.
There are two sets of ranges: yours and his. At first we are only concerned with our own range. Knowing your opponent's range as well as you know your own is an advanced skill which will be treated in my second opus due out in about 17 years.
When practicing movement with a partner, practice determining which range you are in. From time to time, stop wherever you are and test whether you are in the range you think you are. Learn to be absolutely sure which range you are in. This teaches you the critical skill of recognizing the boundary lines between A/B, B/C, and (to a lesser extent) C/D. Recognition of your own ranges will lead to an understanding of your opponent's ranges. By and large, a precise knowledge of your own ranges is the goal here.
And, of course, the real problem is that you are both moving. D can become A in a heartbeat.
The second idea is range movement. Range movement is the skill of moving from range to range as you wish. If you are in C and wish to be standing in A, how do you get there? First, you must know range definition to understand this problem. Secondly, you must anticipate your opponent's movement. Fighters tend to move in predictable ways. They can also have their movement decisions influenced by your actions. Gaining an advantage with just range movement is hard. Most bouts between competent opponents of roughly the same skill level almost always turn into a battle of range movement either consciously or unconsciously.
Watch at the next tournament when equally skilled opponents fight. Some large proportion of the fight will consist of circling on the boundary between A/B or (depending on style and local custom) firmly in B.
Because the fighter seeking to establish an advantage through range movement alone must travel a far greater distance than his opponent, he rarely manages to win a clear advantage.
Why? For two reasons:
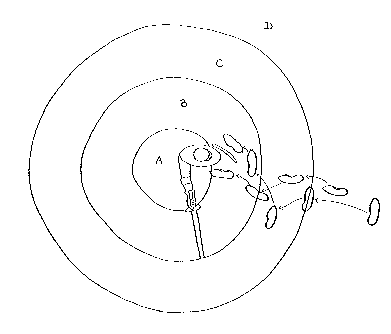
As our tiny, diagonal steps carry us closer to our opponent, he begins to be confused. We aren't walking toward him in a straight line. To him, it seems we can't make up our mind which way to go. To us, we are walking directly at him.
As we cross over the line D/C, we begin to move toward our shieldside (his swordside). Our leading shield edge will be lined up somewhere between his sword elbow and sword shoulder, between the edge of his shield and his sword. Our opponent, Lord Addlepate, does nothing. He thinks to himself, "Aha, he is moving right into my deadly killing zone." In fact, what we've done mostly is to improve our vision of his weapon and to move our shield directly in front of it.
When we are both standing in B, he may throw a blow. We might throw a blow or not depending whether or not there is an obvious opening in his defense.
As we close, we draw nearer to the boundary between B and A. On the B/A line, we step to our swordside. We anticipate that our opponent will do the natural thing. (All together class, what happens when we do the natural thing?) He will take a step or half step to his shieldside tracking us. You may thank him at this point.
Now you may fight in B or you may continue to press the advantage in the spine-tingling mystery world of A.
As I move into A, my shield stops in front of my opponent's elbow -- not on his elbow, but floating 2 to 3 inches in front of and just past his elbow. When solidly standing in A, when you return to stance, place your foot next to his shieldside foot between his shieldside and swordside feet. The leading edge of your shield will be somewhere between your opponent's sword shoulder and sword elbow. His leading shield edge will probably be crunched into your chest or against his sword shoulder. We now rap him smartly on the back of the head or leg. This makes our continued survival a much better bet.
If the opponent reacts in an unpredictable manner, the worst outcome is parity. Why? Because we are in stance and he is not. If his first step takes him backwards, pursuit is called for. Once a foe has his weight on his heels, run him down!
If he compensates by moving further into the swordside (as very often happens), taking the leg, particularly, or head becomes easier.
If he moves to the shieldside, make a shieldside step in which you realign your shieldside foot on his shieldside foot. Many offensive opportunities will present themselves.
A little practice and thought will allow you to plan effective countermeasures for all eventualities.
That is the entry. Occasionally, it will be necessary to retreat. Maybe even very, very necessary. Whenever all hell breaks loose, there are a few options.
The first decision to make is whether you want to do a forward pass or a backward retreat. Remember we're dealing in circles. Most fighters' defenses are severely constrained when you stand behind them.
Begin either maneuver by throwing a blow directly through the center.
The path of the sword should pass through your opponent's forehead, nose,
navel, and between whichever set of reproductive organs your opponent is
equipped with. The point (edge?) is to drive your blade in a straight line
through the center, not to cut diagonally across the torso. A vertical
blow must be blocked with authority; diagonal blows oftentimes need not
be. The difference is whether you drive your enemy onto his heels or not.
We call this blow the "suppression blow" or "crushing blow." It is an important
part of both offense and defense. Throw this blow and make a shieldside
step at the same time.
Then to make a shieldside pass (to pass by the opponent's swordside), return to stance by moving your shieldside foot straight step past your opponent (belly bumping is optional). Then make a somewhat larger than usual shieldside step. Here, oftentimes, the other fighter is trying to compensate by turning toward you with his shield. Here, oftentimes, you have a good chance to dispatch him to Valhalla. Finish the pass with a good sized step with your swordside foot directly back and return to stance. You are now in C and ready to begin the engagement anew. You have pivoted on the leading edge of your shield around the enemy's sword. You are now standing behind his shoulder. You are very safe. The advantage to this maneuver is that it is unexpected and can create offensive possibilities. It is, however, a heartbeat slower than a regular backward retreat and requires an iron will or numbing practice to execute in the heat of combat.
To effect a backward retreat, throw the crushing blow through the center. Make a retreating step with the swordside foot straight back while throwing the blow. This is sort of a hidden step. But remember swordside foot first! Then a swordside step followed by another retreating step. And again you are safely in C now diagonally opposite the dread foeman's weapon.
Sometimes you will find yourself pursuing a retreating fighter. This is a complex situation from a range point of view. You may do anything offensively when a retreating fighter is passing from B to C of his own volition, especially when his weight is on the swordside foot. However, maintain stance when he is fleeing from A to B. It is only a step between the ranges!
Thinking about your entries and retreats is important. Most mistakes are made, not when both fighters are toe to toe standing in B slugging it out (a situation I avoid like the Black Death), but when the fighters are retreating, entering, or pursuing.
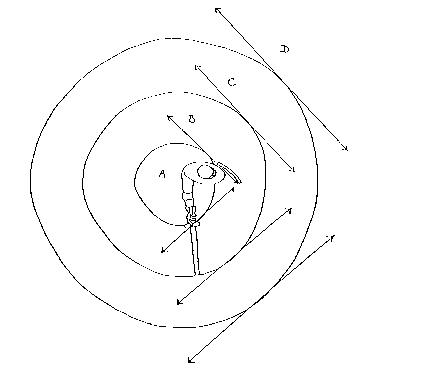
Fights are won on the borders between ranges. And the secret to the borders? It's moving the swordside foot on the tangents of the A/B and B/C lines.
When both fighters are moving, the fighter who moves tangentially will most often prevail. (A tangent is a straight line which shares one spot in common with a circle; in this case, it is the circle formed by the boundary of two ranges: A/B or B/C.) And, amazingly, controlled small steps at a 45 degree angle quite nicely let you step lightly onto these tangents.
Why tangents? Think of two fighters circling each other. What usually happens is that one fighter advances and the other moves to the swordside on the tangent of B\C. The traditional advantage gained in these encounters occurs when one fighter crosses the boundary from C to B, or rarely, B to A. Oddly enough the advantage accrues to the fighter who first realizes the tactical change has occurred, not necessarily to the moving fighter. Enticing your opponent to cross the line unknowingly is a fine practice, for instance. If the two fighters stay on the tangents, neither will gain a movement advantage.
Your swordside foot determines direction. Your shield and you are both in front of your swordside foot. If your knees are bent enough, your upper body moves almost not at all when your swordside foot moves. And your swordside foot always moves first. So what does this have to do with tangents?
The "hidden step" on the tangents allows you to move fluidly and to take advantage of your opponent's mistakes and your successful movement decisions. Your swordside foot moves on the tangents of B/C and B/A. It starts on C/B or B/A and then moves off on a tangent. Since you keep your toe pointed at your opponent, to his vantage point you have moved to the side and farther away. You have moved to the side, but you are still on the same line.
Your opponent will either compensate or he won't. Either way you are in control. If he compensates by turning towards you, your response is an immediate step deep into A. If he does not compensate, he will be vulnerably out-of-position. Then you can move in or out if you like by varying the length of your stride or by taking a forward step.
Continue to Chapter 8